
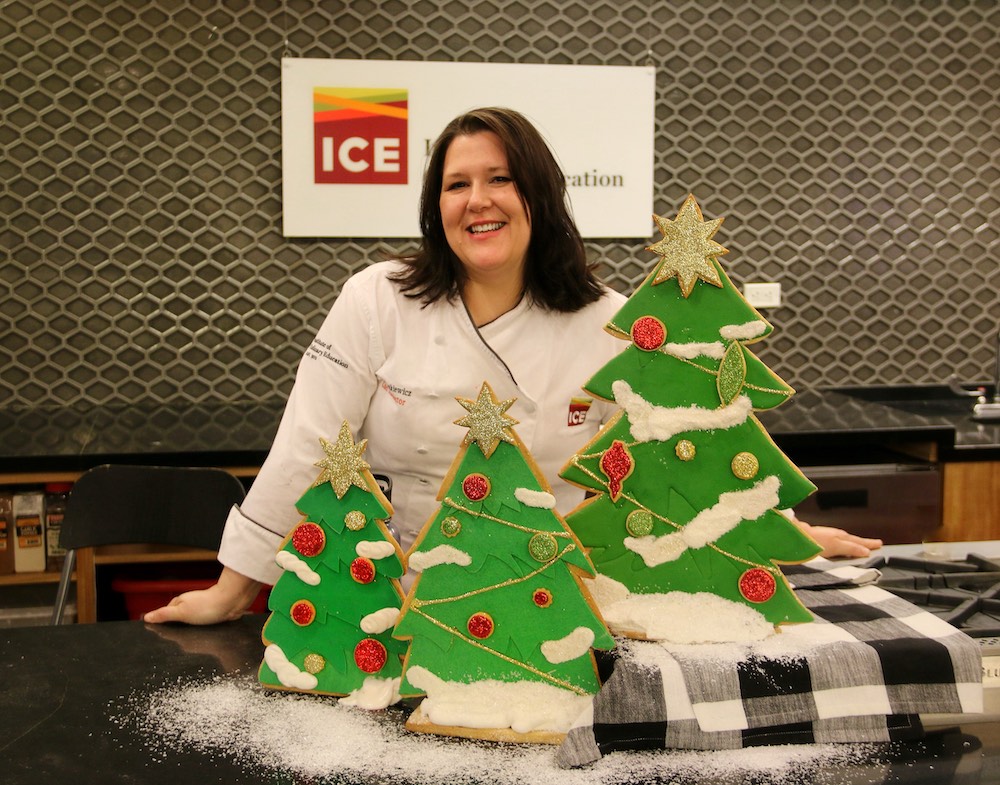
With a few tricks of the trade and a little patience, you can make a gorgeous, impressive and delicious tree-shaped cookie display to bring a little holiday cheer to any space.
Standing a foot tall, this Christmas cookie tree is a show-stopper for sure.
To start, you need a great sugar cookie recipe, like the recipe used in Chef Penny's gold covered sugar cookies (gold leaf not required!) We have also listed another recipe at the bottom of this post, but you can use any trusted one you like.
There are many secrets to successfully decorating sugar cookies. One of the most important parts is creating the perfect cookie canvas — so make sure to look for recipes that have little to no chemical leavening in them. Omitting the chemical leavening will help them stay the same shape even after they bake.
I prefer to roll the dough between two sheets of parchment right after it’s made. Roll half of the dough for the tree to about 1/3-inch thick and a minimum of 13 inches tall and 10 inches wide. Roll the remaining dough for the ornaments to about half that thickness. You’ll want them thinner later when you attach the cookies to the tree.
Chill the sheets of dough in the freezer for 15 minutes or so. If you don’t have room, the refrigerator works well but will take a bit longer. You want the dough to be cold and firm but not frozen. Cutting and baking a chilled dough will also help prevent the dreaded cookie spread.
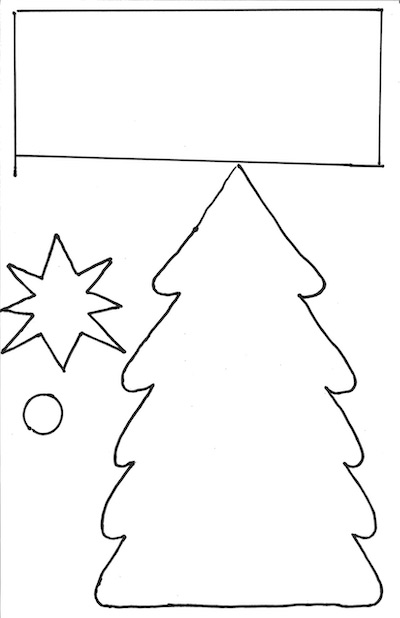
Download and use the template here to cut out the tree shape. Use a sharp paring knife or a utility knife to cut out the shape from the chilled dough sheet. You’ll also need to cut out a rectangle template to use as a base later. Use a small circle cutter to cut the ornaments and/or use the templates for the ornaments and the star that goes on top. Any trim from the dough can be rerolled and used again.
Bake the chilled dough in the oven at 350˚F. The ornaments are done when there is a little golden brown around the edges, about 8-10 minutes for this size. The tree will take longer. Start checking it at about 15 minutes. You want to dry it out a bit more because it will need the strength to stand up. Let all the cookies cool completely.
You can use royal icing to line and flood the cookie. You’ll need to let the royal icing dry overnight before trying to do anything else with the cookie, but if you want a fast and super clean look, you can use modeling chocolate to cover the cookie instead. Follow the recipe exactly, and then color it as you like when kneading the rested modeling chocolate. After the chocolate sets it will be pretty hard. You can microwave it in very short bursts to make it a bit easier to knead. And I mean it: short bursts, about five seconds each. Any more and it will separate out and become completely useless.
Related Reading: The History of Royal Icing String Work
After coloring and rolling it, cut the chocolate out using the same pattern you used for the cookie. The cookie will have spread a bit in the oven but still kept its shape. Using the template again, you’ll have a little edge of cookie showing, which I like. If you don’t, place the sheet of chocolate over the cookie and using a paring knife, trim it to shape. Attach the chocolate with some royal icing.
You can ice the cookies with royal icing or with the same modeling chocolate. If using royal icing to decorate the cookie, make a double batch of the recipe below. If just using it to glue, then you’ll only need the small batch.
If using edible glitters, it's best to put them on right away when the icing is still wet. Sprinkle the glitter over the iced cookie and let it dry completely. To use the glitters on the modeling chocolate, paint the top of it with corn syrup to give the glitter something to stick to. When dry, you can brush off the excess glitter with a paintbrush. You can put glitter over a white flood icing, but it will look better if the icing is colored similarly to the color of the glitter. I used gold/yellow, red/red and green/green.
On day two, attach the dry ornaments to the dry tree. Let this lie flat for about two hours to make sure it's secured. If using modeling chocolate to decorate the tree and ornaments, there is no need to let it dry so you can move forward right away. Pipe a small amount of royal icing on the back of each ornament cookie to attach it to the tree. I also used the stiff royal icing to pipe mounds of snow on the tree. Be creative! Let this dry for about two hours.
Then, you’ll attach it to the foot. Pipe thick royal icing along the center of the base, and place the cookie on top. Have something heavy standing by, like a pan or quart container filled with water and covered, to hold the tree up while it’s drying. It will take several hours for it to dry securely enough to remove the supports.
And that’s it! Go crazy with the décor or keep it simple. Be inspired by your family’s tree, the Rockefeller Center tree or like me, Rudolph the Red Nosed Reindeer and the felt animations of the ‘60s.
And always keep in mind, it’s a holiday — so have fun.
More Holiday Cookies: The History of Mexican Wedding Cookies

Ingredients
- 510 grams unsalted butter
- 675 grams granulated white sugar
- 1020 grams all-purpose flour
- 1 teaspoon baking powder
- 1 teaspoon kosher salt
- 1 egg
- 4 yolks
- 1 tablespoon vanilla extract or paste
- 1 tablespoon rum or bourbon (optional for flavor)
Directions
- In a 6-quart standing mixer with the paddle attachment, cream the butter and sugar on medium speed until light and fluffy, or about 5-8 minutes.
- Add egg and yolks one at a time and mix only until combined. Add vanilla and liquor if you’re using.
- Combine the flour, baking powder and salt, and whisk to combine them well. Add dry ingredient in 2 to 3 increments, mixing only until combined.
- Divide the dough in half and roll half to 1/3-inch thickness no less than 14x10 inches, between two sheets of parchment.
- Roll the remaining dough a bit thinner. Chill both sheets until firm.
- Use the templates to cut the chilled dough into shape. If this takes a bit of time, chill the dough again before baking. Bake at 350 F. Ornaments are done when golden brown around the edges. Tree and stand should be baked further for strength. It will likely be light brown over the entire cookie.
- Cool completely before icing.
Royal Icing
Ingredients
- 1 pound confectioners sugar
- 3 egg whites
- 1/2 teaspoon lemon juice
Directions
- Place all of the ingredients in the bowl of a mixer with the paddle attachment. Beat on medium speed until stiff peaks, or about 10 minutes or so.
- If using to ice cookies, double this recipe. Leave half of it as stiff, and make the remaining icing flood consistency. Add water, one teaspoon at a time, mixing completely until when you test it by dotting it on the counter, the test smooth’s over completely in a 10-second count. If too fast, add more confectioner sugar.
Modeling Chocolate
Ingredients
- 2 pounds white chocolate
- 7 fluid ounces of corn syrup
Directions
- In a microwave-safe bowl, melt white chocolate. First burst is 1 minute and stir. Continue with 30-second intervals and stirring between.
- Move to a bowl much larger.
- Place corn syrup in the microwave for 45 seconds just to warm.
- Pour corn syrup over the melted chocolate in a crosshatch pattern.
- Fold it together with no more than 24 -30 strokes. Mix this too much it and may break and not be usable.
- Remove modeling chocolate to a sheet pan lined with plastic wrap. Cover the top with plastic wrap and press into a thin sheet.
- For best results, let this sit for 8 hours or overnight to cure. If in a rush, you can refrigerate it to set. But this will not cure as well and could be a bit more oily to work with in the beginning. Use cornstarch to knead it if it's too oily.
- After the modeling chocolate has cured, knead it to bring it to rolling consistency. Color with powdered colors or gel pastes.
Study with Chef Penny in Pastry & Baking Arts at ICE.

